Sunday, May 1, 2022

I didn't know they were THIS hardy!

Anyone who's been vegetable gardening for more than a couple of years has a good handle on some of the hardier plants. They include many herbs, such as oregano, parsley, and peppermint. They include certain greens, such as kale, Swiss chard, and corn lettuce. Some are hardy because of their resistant to below-freezing temperature. Some are drought-hardy. Some are both.

But of all the types of plants that come back year after year, regardless of how cold the winter, regardless of how little water they get, one type of plant you never hear about surviving very long: fruit-bearing plants that have been confined in a container whose soil has been allowed to dry up.

But I recently discovered differently. I recently discovered that strawberry plants, grown in containers, can miraculously come back to life after being completely neglected during a drought.

As a last ditch effort to protect our strawberries from being eaten by rodents, I had my husband build long boxes several feet off the ground. He lined them with leftover pond liner and filled them with potting soil, then planted in brand-new strawberry plants.
Being new plants, and in disease-free soil, the theory was that they wouldn't get anthracnose. However, the plants must have contracted the fungus in the nursery, because the very first berries they bore showed signs of the disease.

I was ready to give up on them by June. But I had my husband continue to water them. Because maybe if we started spraying early the next spring, we'd be able to keep the anthracnose at bay, at least until we harvested a few pints of berries.

However, we're off the water grid, and most of last year any rain that was forecast went around us. The water in the small pond he was using for the strawberries disappeared much more quickly than it had since my husband first dug it out.

I regretted putting the plants in containers, because strawberry roots in the ground can survive a drought. Not so when they're in a container. You can even see the new shoots from last summer and fall that tried to get to the ground, and didn't make it, that they eventually dried up.

Of course, that was going to happen to the plants in the boxes, as well.

Or, so I thought. Because that's what the gardening gurus say. And, indeed, by the time autumn arrived, every single leaf had dried to a crisp. I was certain that the roots had dried up and died, too. A few of the new shoots made it to the ground, rooted in in time, and survived. But many of the shoots dried up before they could find their way into the soil.

Well, watch the video below and look at the strawberry plants now. 


Check out the green leaves. The flowers. The baby strawberries. Granted, since the two sleet storms in February, we've been getting more or less the amount of precipitation that is normal for this area. Still, that usually hasn't amounted to more than an inch a week. Not nearly enough for containers, especially for the ones on the bottom, and sometimes it's been ten days between rain showers.

Turns out, strawberry roots can survive a certain amount of drought. And the actual plants don't need nearly as much water as we thought in order to bear fruit. Of course, they'll produce more and better quality fruit if they get water on a regular basis, so we're going to start taking care of the plants. We've even begun a natural fungicide regimen that we hope will delay, if not prevent, the anthracnose that always has ended up ruining more than half our potential crop.

And after the plants are finished bearing fruit for the season? We're not going to water them nearly as much as we have been. Just enough to keep the roots alive, and at least some of the leaves green.

As for the ones growing in the ground? I'll never worry about them again.

Happy strawberry gardening. And remember: the gurus don't always get everything right.


Friday, April 29, 2022

One Of My Favorite Spring Delights: The Hummingbird Moth!

 "Hummingbird moth."

That's what I said to myself when I first saw this most peculiar insect that I'd never seen before. Initially, I thought the thing was actually a hummingbird. It hovered and zoomed from flower to flower, its wings going a thousand miles a second. But as small as hummingbirds are, this creature was even smaller. And the coloring wasn't right.

And, wait a minute, that's not a beak. That's a proboscis, like what butterflies have! Except, it's body is large and furry, like a moth.

After watching not one, but several of them, enjoy the nectar of some wildflowers, I went inside and searched online for "hummingbird moth." Of course, that couldn't be the actual name of the insect. But since it made sense, I was sure I wasn't the first person to so dub it as such. Thus, I was sure that someone would have used the term in an article that revealed its proper name.

Lo and behold, I was wrong. 

I mean, I was right. I was wrong that I wasn't right about its name. Because - drum roll, please - "hummingbird moth" is the common name for that interesting critter! 

Though I was raised in a rural area, I'd never seen or heard of one until we moved onto our rural property eight years ago. That year, there seemed to be plenty, though we only saw them for about a week. Every year since, they've proven to be a rare sighting. I've seen up to three on separate days during the first week of April. The past year or two, I didn't see any at all.

Then came this year. Are hummingbird moths like cicadas, having a major hatch-out every so many years? Or have we seen so many because of our relatively new cherry tree, one of the moth's favorite place to lay eggs?

Whatever the case, this entire month (April 2022) we've seen numerous of these fascinating insects every day. Only now, as May quickly approaches, is their population decreasing. 

They've been a delight, and I'll miss seeing them around. But I can always watch the following video if I get to missing them too painfully.

If you've never seen a hummingbird moth, or rarely, you might like to watch the video, too. :)

(Interesting side note: in the video, the wings don't blur nearly as much as they do when you're watching them in real life.)


Tuesday, April 26, 2022

Easy To Grow Vegetables For First Time Gardener, Part Two

 In part one of Easy To Grow Vegetables For First Time Gardener, I explain how to grow lettuce, kale, and potatoes (grown in mulch). A beginning gardener should start slowly and small if they want success, if they want to feel competent in their gardening endeavors. And those three crops make success with growing your own food an easy achievement.

Which vegetables should you try growing once you've got those three down? How about beans, cherry tomatoes, Egyptian (walking) onions, squash, and cucumbers?

Remember that the soil should be enriched with organic material before you begin. And, except for the onions, all of the crops I'm going to discuss in this article require six hours of sun per day.

Also except for the onions, they will be killed by even a slight freeze (frost tender), so plant them out a week or two after the last average frost date for your area.

Beans.

Bush beans. Pole beans. Chinese long beans. Dried beans.

There is a variety of bean for everyone, and none of them require much more than proper watering, correct spacing, and a little pest control to get them producing so much that you risk getting tired of picking beans! They also are beneficial to the garden soil, as well. Legume plants – namely, beans, peas and lentils – fix nitrogen into the soil, helping feed the other plants growing near them.

I'm going to focus on green beans here, though the principles of growing them generally apply to all types of beans.

First of all, in my experience it's easier to grow bush beans in the north, and pole beans in the South. Pole beans seem to take the heat a little better, and I haven't had the pest problems on my pole beans as I have with bush beans.

Pole bean growing up PVC pipe in raised bed.


That said, I've read that you can prevent the Mexican bean beetle on bush beans and the Colorado potato beetle on potatoes if you interplant bush beans and potatoes together. That's an experiment I might try one day.

If  you're using the Square Foot Garden method of spacing, the SFG gurus will tell you that you can plant nine bush beans in a square foot. In my experience, that's too many. Four or five per square foot allows the plants much more room to breathe, and diminishes their risk of getting a fungal disease (which, by the way, I don't think I've ever seen on my pole beans).

If you're planting pole beans, they need something at least six feet long to climb up. A cheap and easy thing to do would be to push short sticks into the ground, three or four inches apart, then on each stick, tie one end of a six-foot long piece of string. Pull the string tightly at an upward slope and tie the other end to the top of a fence post, tree branch, or trellis that you're using to support other vegetables. The pole beans will wind themselves around the string as they grow.

Otherwise, stick some kind of six-foot-tall pole in the ground, one per bean. Space the poles three to four inches apart and plant each bean seed right next to the pole.

Most beans require regular watering. When the top two inches of soil are dry, they need water. This isn't true for all beans, however. For example, I know from personal experience that both mung beans and Chinese long beans are highly drought-tolerant. When we have several weeks of 95+-degree temperatures (that's Fahrenheit) and no rain, I've only needed to give these kinds of plants about a half gallon of water each once a week (even once every other week).

Cherry tomatoes.

It might surprise you to see tomatoes in a list of easy to grow vegetables for beginners in the garden. Some expert growers say they're a more advanced crop, probably because of all the diseases and pests that can take them down.

Others claim, if you have healthy soil, growing tomatoes is a snap.

The truth is somewhere in between. However, if you want to reduce the risk of disease on your tomato crop, have a crazy prolific harvest – even in temperatures above 90 degrees (F), when the blossoms of many tomatoes turn sterile and fall off – and reduce the risk of tomatoes cracking (and thus rotting) before they get ripe, cherry tomatoes are what you're looking for.

Cluster of cherry tomatoes within plant.


Start the seeds indoors two months before the last average frost date plus two weeks, or buy cherry tomato seedlings from your local nursery.

Tomatoes are fairly heavy feeders, so even though you're planting your veggies into rich soil, throw a couple of banana peels into the hole where you're going to plant a tomato.

Most gardening experts advise you to keep tomatoes pruned down to one or two main stems. Instead, you could plant your tomatoes every three feet, and either tie them to a trellis every vertical foot or so as they grow, or have them grow in a sturdy cage where they spread out as much as they want. I've done this before, but tell you what: you end up with this huge mass with tons of tomatoes hidden inside that end up rotting. So you might as well take the bit of time to prune your tomato plants every week or two.

If you want to keep the plants pruned to one or two stems, inserting a stake about a foot into the ground, and at least five feet above ground, then tying the plants to it as they grow will be sufficient support for the plants.

In the beginning, tomato plants appreciate a decent amount of water (like the beans), but as they grow and get established you may be able to get away with giving each plant a gallon of water every other week.

Cucumbers.

Cucumber plant growing over cardboard mulch in high raised bed.


Cucumbers are another controversial crop. Are they an easy vegetable to grow for first time gardeners? Many say no, because they are so prone to fungi in humid climates.

So, buy varieties that are resistant to powdery and downy mildew. Or, plan to plant a new cucumber plant every three to four weeks, up until two months before your area's first average frost date in the fall. That way, when one plant succumbs to a disease, you've got another one ready to go.

Pick off, or spray with orange oil or diluted liquid castile soap, any cucumber beetles you see before they have a chance to spread disease.

Finally, cucumbers are thirsty plants, and would prefer that the soil around the roots stay moist at all times. They would appreciate a gallon of water every other day, perhaps every day, during the hottest time of the summer. The exception would be if the plants are surrounded by six inches or more of wood chip mulch. In that case, they won't need to be watered as often.

Either way, cucumber plants let you know if they're not getting enough water by turning the fruit bitter.

Squash.

Butternut squash fruit lying on a very long vine.


Both winter squash and summer squash are generally easy to grow vegetables for beginners. They need the average amount of water, and the average amount of fertilizer.

HOWEVER.

The big caveat with squash being an easy vegetable is that it has two major predators: the squash bug, and the squash vine borer.

The squash bug isn't found everywhere (for example, Minnesota gardeners have never heard of the squash bug), so you may not have to worry about it.

But if you do live in a place where squash bugs abound, they can take down a zucchini plant pretty quickly. Some people take a hand-held vacuum out to their garden and regularly vacuum them up. Peppermint essential oil repels them, so you might try spraying the plants once or twice a week, either with peppermint oil diluted in water, or with peppermint liquid castile soap.

Be aware, however, that both peppermint oil and soap will kill beneficial insects, so spray early in the morning or just before sunset you don't kill anybody you don't want to kill.

One year I planted a borage next to a zucchini, and didn't have any squash bugs that year. So you might try growing a variety of aromatic herbs around whatever kind of squash plant you decide to grow.

The squash vine borer is a bit trickier, as the mama moth lays its eggs on the stem of the squash vine when you're not looking. When the larvae hatch out, they eat their way in and through the stem, quickly killing the plant.

Squash vine borers don't bother butternut squash plants, which is why it's the only winter squash I grow now. For other varieties of winter squash, bury a few inches of the vines for every foot they grow to discourage the moths from laying eggs.

And just like with the squash bug (or any insect pest, for that matter), surrounding the plants with a variety of herbs and flowers will make it harder for the moth to detect the scent of the squash vine.

Egyptian, or walking, onions.

Walking onions gone to flower in late May, southern Oklahoma.


Walking onions have to be number one on the list of easy to grow vegetables for a first time gardener. Why am I writing about it last, then? Who knows? Probably because I don't use them that often, and so they stand around in my garden, bored out of their little onion minds.

If you like cooking with onions, and you don't grow anything else, grow these. Plant the bulbs once, and you'll never plant them again. Not only that, but they'll also slowly spread into other parts of your garden of their own volition, and without asking permission.

You can cut the tall, green stalks off any time before they develop flower heads (when the temperatures head up toward 80 degrees F in the spring or summer) and use them raw in salads, or cooked in any dish that you want to add onion flavor to. When the onions go to flower, the stalks get tough and are only good to use as flavoring in broth or soup.

You can also harvest the little bulbs that form once the flowers go to seed. But hurry! The stalks are going to bend to the ground in order to plant the bulbs to produce new green stalks. This is why they're called "walking" onions. They seem to change locations all by themselves, when really they're just replanting themselves. Cool, huh?

Seed head of Egyptian onion, or walking onion. The tiny bulbs have already started growing new green shoots.

Ready to grow?

Now you know the eight easy to grow vegetables for a first time gardener. So, what are you waiting for? Get your garden plot ready, and get growing!

Monday, April 25, 2022

Three Gardening Hurdles That Are Easier To Jump Over Than You Think!

Search online for "how to start a vegetable garden," and you'll find an abundance of advice. You'll be told to start a compost pile, build a raised bed in an area of your yard that's in full sun, set up a watering system.

All that advice is well and good, but it largely ignores one thing: not everyone has the perfect circumstances to build a perfect garden (which doesn't exist, by the way, no matter what Instagram leads you to believe!). In fact, many people who truly want to grow their own food, at least a portion of their vegetables, run into snags early on in their endeavors. 

I'm going to address three of the most common hurdles that keep enthusiastic would-be gardeners from getting started, and show you how they're not as difficult to overcome as they may seem at first glance.

First hurdle: Not enough space.

Perhaps you rent a house, and your landlord/lady has forbidden you from digging up the yard. Or you live in an apartment. Or both your front and back yards are the proverbial postage stamp-size. 

For the last one, check out my post about gardening ideas for tiny backyards. For the others, container gardening is the way to go. Even if you live in an apartment that has no deck or balcony, you can set up a few pots in the bathroom, the corner of the living room, or the closet with grow lights hanging above them. When I lived in a condo, I had a few pots outside on my balcony, and against my dining room wall I had a plastic utility shelf with fluorescent light fixtures attached to the bottom of a couple of the shelves and grew herbs in pots underneath the lights. 

It would be fifteen years before I'd learn that one can be self-sufficient in lettuce by growing it in a similar way, semi-hydroponically.

Second hurdle: Not enough money.

Watch a dozen random videos about growing your own food, and you'll come away thinking that gardening is an expensive endeavor. While it can be, it certainly doesn't have to be, especially if you're not in a hurry.

You can find garden tools at a discounted price, or even free, on places like craigslist or freecycle. There, you can also find cast-off lumber to use to build raised beds. 

But raised bed borders are a convenience, not a necessity. You can build up a borderless raised bed simply by gathering and piling up leaves and other organic matter until you have a good eighteen-inch pile, then placing broken-down cardboard boxes on top of it all and weighting the cardboard down with rocks or bricks. Wait a year - two is even better - and you'll have rich, nutritious soil in which to plant seeds and seedlings. 

Speaking of seeds, if you don't even dare shell out to purchase those, ask your gardening neighbors or your social media acquaintances to give/send you some. 

Gardening will cost you some money, at least in watching your water bill go up in the summer. But it certainly can be done on a budget.

Third hurdle: Not enough time.

If you're reading this blog post, you have enough time to garden. 

Seriously. 

Because, if you worked sixteen hours a day, you wouldn't have time to mess around with researching vegetable gardening online, or fiddle around with social media, or watch Netflix. I must therefore conclude that you work the typical eight- to ten-hour day, and typically have two days off per week. 

You. Have. Time. To. Garden.

It's a matter of priority.

Ever heard of Nora Roberts? The author who cranks out four number-one bestselling novels every single year? She writes Monday through Friday, about eight hours per day. And when the weather warms up, she gardens.

On the weekend. Only.

It's a hobby she enjoys, so she makes time for it on the days she's not committed to working on her next blockbuster novel.

Whether you want to take up gardening as a hobby, or save money on your grocery bill by growing some of your own produce, or even make supplemental income with a market garden, you have plenty of time to do it.

As long as you prioritize. 

A basic backyard garden requires fifteen to thirty minutes a day of maintenance. That's it. If you can't carve out that much time, or dedicate a few hours on the weekend, for weeding, mulching, watering, harvesting, and pest control, you really don't want to garden. 

**********

There you have it: the three most common hurdles to growing a vegetable garden. Now you know that they aren't nearly as high as you originally thought.

Get out there, and get growing!

Sunday, April 24, 2022

Easy To Grow Vegetables For A First Time Gardener, Part One

 Which are easy to grow vegetables for first time gardeners? The question is debatable, partly because the answer depends on which climate you live in. But unless you live at one of the poles or in a tropical area, there are several vegetables that are generally easier to grow than others.

In this article, I'm going to talk about the three that beginning gardeners should start with. Why only three? Because when you start small and slow, then you have much more success, and you're much more likely to keep gardening next year. And, this would be a super-long article if I had all eight in it. ;)

But in the next article on the topic, I give you five more.

Get the basics down first.


If you're serious about growing your own food, you have to prepare your garden correctly before you sow any seeds or transplant any seedlings. If you don't, trying to grow even the most forgiving of vegetables can end up being an exercise in frustration.

The first thing to do is to make sure your vegetable garden site will receive at least six hours of sun for fruiting plants (tomato, squash, cucumber, pepper, etc.), and at least four hours of sun for leafy plants and root vegetables such as carrots and turnips.

The second thing is to make sure your soil is well-amended. Avoid tilling it at all cost, because that disturbs the soil biology which help your crops to be healthy and produce the best they can.

How do you avoid tilling? Cut the grass or weeds covering your garden site as short as you can, then layer cardboard or several layers of newspaper over the area. Water this paper layer, also known as "sheet mulch", then on top of that pile six to twelve inches of whatever kind of organic matter you can get your hands on – dried leaves, grass clippings, compost, kitchen scraps, seed-free weeds, and so on.

Water every time you've got three to four inches piled up, and water again just before covering it.

Cover it up with either more cardboard, or biodegradable black plastic mulch, using rocks or bricks to weigh them down. This will keep weed seeds from falling into the organic material, and will keep mice from building nests inside it.

If you use the black plastic, it will have the additional benefit of helping the organic matter underneath it to break down more quickly.

After a four- to twelve-month period, depending on whether you used the black plastic and what kind of material you used on top of the sheet mulch, the organic matter will have turned into soil. This soil will be rich with nutrients and soil micro-organisms, as well as be easier to work than the native soil.

Now that you know how to prepare a garden bed that will produce happy plants, let's get onto the first three easy to grow vegetables for first time gardeners.

#1: Lettuce.

Red romaine lettuce growing in mulch.


Lettuce is a cool-weather crop, and will take a freeze down to about twenty-five degrees Fahrenheit. If you live in a mild-summer climate, you may be able to grow crispy, sweet lettuce all summer.

If you live in a hot-summer (mostly 85-degree-Fahrenheit and hotter temperatures) climate, you have to plant the lettuce two months before the consistent eighty-degree-plus temperatures hit, or it will bolt and get bitter before you have a chance to harvest it.

On the other hand, you'll be able to grow lettuce from late fall to early winter, and late winter to mid-spring. Years when you have a mild winter, you'll be able to grow lettuce all winter long.

Sow seeds or transplants three to four inches apart. If you sow seeds, sow them one-fourth to one-eight inch under the soil's surface. Also, you'll need to keep the top of the soil moist until they germinate. This is true of any kind of seed that you sow.

In addition, until they're about three inches tall, seedlings of any kind of plant need more frequent watering than the larger plants (say, when the top half inch of soil or less has dried). So do transplants. Since they need a week or two for their roots to get established, water them the same as for small seedlings.

The one trick to growing lettuce is to keep the soil slightly moist at all times, even when the plants get mature. If lettuce doesn't get enough water, the leaves might turn bitter even before the plant begins to bolt. So every day or two, go out and test the soil where your lettuce is growing, and give your plants some water if the soil has gotten dry a half inch deep. Mulching around the plants with wood chips will help keep the soil moist.

Misting the plants every day will also ensure they don't bolt prematurely. Use a pesticide sprayer, or, better yet, irrigate them with a sprinkler.

If slugs are a problem where you live, sprinkle diatomaceous earth around the plants once or twice a week, or after it rains. Or you can use the old beer trap. Sink shallow containers (such as lids to storage containers) into the ground and fill them with beer. The slugs like beer better than anything you have in the garden, and will drown themselves trying to consume it.

#2: Kale.

A kale plant that volunteered in our front yard a few years ago. Turns out, the rabbits don't like it!


Kale is one of the easiest vegetables for beginning gardeners because it is so low-maintenance. It is cold-hardy, somewhat drought-tolerant and has only three pests that I know of: grasshoppers, aphids, and cabbage worms. I'll get to them in a minute.

In my experience, kale can survive temperatures as low as the mid-teens (F), and can tolerate warmer temperature than lettuce before bolting. If you live in a hot-summer climate and want to grow kale in the summer, you may be able to prevent it from bolting by planting it in an area where it won't get afternoon sun.

Sow seeds about a quarter inch deep, or plant transplants, about a foot apart for bushier kale varieties. Dinosaur, or lacinto, kale can be planted four inches apart because their growth habit is more narrow.

If you're an urban or suburban gardener, the only pests you're likely to have with kale are aphids and cabbage moths. Both urban and rural gardeners can prevent an aphid infestation in one of two ways.

First, they can make sure not to grow kale into the hot summer weather. Or, as I stated earlier, grow your leafy greens in a place where they will get morning sun but afternoon shade.

Second, grow sunflowers around the edges of your garden. Above all other plants, aphids love sunflowers the most. Even better, aphids can't harm sunflowers as they can your dark, leafy green crops.

If all else fails, you can spray the plants with a liquid soap solution (one tablespoon soap per gallon of water) every day until the aphids appear to be under control.

Grasshoppers are the bane of a rural gardener's existence when it comes to the cabbage-family crops such as kale...especially for vegan gardeners, who won't have any chickens around to eat up the bugs. If you're vegan and live in the country, your young kale will probably be eaten down to the ground before it even has a chance to grow.

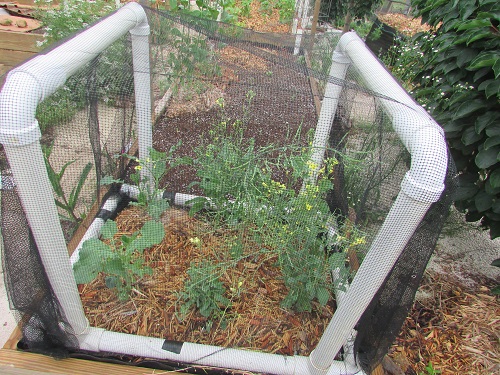
How to prevent this destruction by this eternally hungry insect? Cover your kale.

Kale growing under one of our PVC-beetle netting cages.


We have three two-by-three-by-three-foot cages made of PVC pipe and beetle netting. This covers six square feet of kale and will keep both the grasshoppers and cabbage moths away.

Or, you can bend 1/2-inch PVC into hoops, attach them to sides of a raised bed (or insert them over pieces of rebar stuck into the ground), then cover the hoops with lightweight row cover.

Once the plants grow to at least five inches high and the leaves start to grow to hand-width proportions, you can uncover them if you want. The grasshoppers will still eat them, but you'll end up with just a hole here and there rather than the entire plant disappearing overnight.

You may, however, still end up with cabbage worms if you uncover them. Then you'll need to either check for them every three days or so, and if you find any, either pick them off by hand or spray them with peppermint or orange essential oil diluted in water.

#3: Potatoes.

If you've read a typical gardening book that explains how to grow potatoes, you might not think it's a particularly easy to grow vegetable for a first time gardener. Well, that's because most gardening books make it sound like rocket science, with all the constant digging and hilling to make sure the greens don't overgrow to the detriment of the tuber production (because if you don't reduce the green growth, the plant will put its energy into producing more greens, rather than tubers).

The same books tell you not to plant potatoes until all danger of frost is passed.

But there's another method that make growing potatoes a piece of cake. That method is to bury the seed potatoes in mulch. Here's how you do it.

First, set an entire seed potato on top of the soil.

That's right, you don't need to cut it up.

And when I say to set it on top of the soil, I'm assuming it's well-amended and therefore nutritious. If not, you should put a couple inches of compost on the soil first, then set the potato on top of the compost.

Second, cover the potato with eight to twelve inches of straw or wood chips (definitely twelve inches if you're using straw, as it's not as dense as the wood chips and will decompose more quickly).

Third, walk away.

That's it. No watering, no "hilling." After a month or so, start checking to see if any green growth has emerged from the mulch. About two months from piling the mulch on top of the potato, carefully pull back some of the mulch to see how big the tubers are. You can harvest them as new, small potatoes, or let them grow larger.

Speaking of frost...When you plant potatoes under mulch, you can plant them before the last average frost date. In fact, in some areas you can bury the potatoes in mulch in the fall, and then harvest them the next spring.

You just have to be careful if you plant them while your area is still experiencing freezing temperatures. If the greens pop out of the mulch, a freeze will kill them off, and that may or may not destroy the sprout. More greens may grow back once it warms up again, but it's not a guarantee.

On the other hand, if you plant potatoes in late summer and they mature sometime around the first frost of the year, you don't need to harvest them all, as you'd have to if you were growing them in soil. But you might want to throw some extra mulch on top of them to be sure they don't get frost damage while they're waiting for you to harvest them.

Perhaps the best part about this method of growing potatoes (also known as the "Back To Eden" method) is the harvesting. No digging into the dirt! No messing up your hands or gloves, no accidentally breaking potatoes with a shovel. All you have to do is remove the mulch.

Some potatoes may grow into the soil, but not many, and not very deep.

*********

There you have it! Three easy to grow vegetables for a first time gardener! Click here to read about five more such crops.


Happy homesteading. :)


Saturday, April 23, 2022

Spring Cleaning In The Garden

 I did it again.

I let the weeds get away from me this spring. It's just so hard to get motivated to get out and hoe and pull weeds in January and February (yes, where we live, weeds can and do germinate and grow that early), even March, when it's so cold. And this winter, I'd convinced myself that I didn't care if the garden became overrun with weeds.

Well, come the beginning of April, I did care. I especially cared that the weeds were consuming all the nutrition out of my new-ish lasagna beds. They were also preventing me from seeing baby stalks of asparagus, the only food that will come out of the garden this season, that were sprouting up.

So I decided I would at least weed the asparagus area.

Here are the before photos. This first bed is supposed to have asparagus in it, but alas, last spring when I planted in the seedlings the organic matter in the bed hadn't composted fully enough for the roots to get established. They all died or were eaten by grasshoppers within a matter of weeks. 


Here, in the following photos, is the area again. After I weeded the two lasagna beds, my husband piled up some mulch inside them. Eventually, we'll add more mulch around the other asparagus plants as well, as much the existing mulch has turned to soil. 

Notice how much easier it is to see the asparagus. Of course, there is a lot more growing now than when I took the first pictures, as it took at least a week for me to complete the weeding. 


They're hard to see, but there are several tall stalks of asparagus growing in the bed in the foreground.


Except for the dandelion, the green growing out of the mulch are asparagus stalks.

SUPER hard to see, but there are a few small asparagus stalks growing in this picture. Most are purple.

***********

Lesson learned: don't be lazy in late winter! I need to get out and hoe up the weed seedlings before their roots get established.

Friday, April 22, 2022

Seven Compelling Reasons To Homeschool


 Homeschooling isn't scary.

It's not.

Neither it is weird or something to be ashamed of when your distant relatives ask, during a get-together, what grade your child is in.

The truth is, homeschooling provides several big advantages over the traditional school experience. As a thirteen-year veteran teacher whose child has never been in school, I know. I want everyone to know, so, here goes.

#1. You can center the education around your children’s abilities and needs.

If your child isn’t understanding a certain concept, you can either go back over it several times until they do, or revisit it occasionally over the next few weeks, or completely drop it and wait a few months for their brain to mature into the particular concept.

On the other hand, if the child understands something right away, you can move on to the next thing.

If your child is a mover and a shaker, like mine, you can schedule several short lessons over the day instead of having him sit down for long periods of time at one shot. If your child is a late-bloomer, you can wait until she is eight or nine to start on the formal academics.

And so on.

#2. Homeschools are safe.

Safe from bullies, safe from drug pushers, safe from mentally ill teenagers with guns.

I need to put this out there: many children do not tell their parents that they are being bullied. Or sexually harassed. Do not assume that because they are doing well in school and seem generally happy that nothing is going amiss while they are at school. School teachers cannot keep an eye on twenty-five plus children all day long. And many kids have sneaky down to a science.

I know. I used to be a school teacher, remember? Not to mention a student in a school.

#3: Homeschooling allows for flexibility in everyone’s schedule.

You can go on vacation whenever it is most convenient for your family, not just during the summer and holidays. If your children are early risers, they can get all their formal academics done in the morning and spend the afternoons, when they are more tired, engaged in less intense activities. And vice-versa for Night Owls.

You can schedule appointments whenever, without having to worry about who is going to be home for the children after school, without having to try to fit in visits to the pediatrician after three in the afternoon.

#4: Homeschooling parents develop deeper bonds with their children than non-homeschooling parents.

A few years ago, I had a friend – whose daughter was about a year and a half younger than our son – tell me that she was not going to homeschool because she thought her daughter would drive her crazy.

I understood. Our son has ADHD. And until he turned nine or so, I kept being tempted to send him off to school. But then a wonderful thing happened: he started to want to be with me. And I started to want to be with him. We got to know each other on a level that would not have been possible had I given in to that temptation. If I had decided to send him to school, all I would know about him is how crazy and obnoxious he would act at the end of the school day. I have no doubt our relationship would be strained, and one of us would end up eventually needing therapy.

I know a woman who is close to twenty years older than I who had the same experience with her children. While she did not homeschool them through high school, she testifies that she developed deep bonds with her children during the period that she did.

I believe that my friend missed out on a great opportunity to really get to know her child.


#5: Your child is not forced to become a robot.

A homeschooled student gets to eat, drink, and use the bathroom whenever she wants. If she’s not feeling well she can take a couple of hours or the rest of the day off.

(Gee, sound like homeschoolers might actually be healthier than schoolers, eh?)

During his free time, he can engage in whatever activities interest him, read whatever books he wants. He will also feel much more free to share his opinions and ideas and thinking processes than he will in a school situation.

Speaking of thinking…

#6: Homeschooled children usually are better thinkers than schooled children.

I don’t care how many Ivory Tower head-nods are given toward Bloom’s Taxonomy of Knowledge, nor how many principals demand that this Taxonomy show up in lesson plans. I don’t care how many cute logic puzzles a teacher does with her class. Public schools do a lousy job of teaching critical thinking.

Public schools exist to turn children into obedient young people who will become obedient employees.

Employees who think are dangerous. They upset the status quo. Worse, they might leave one day and start their own business and become competition. (Or, they might leave and write a book about the dark side of public schools.) Ooooo! We can’t let that happen now, can we?

#7: Homeschooled children have the opportunity to dig deeply.

No, I don’t mean bury themselves in a hole in the ground. I think the homeschooling parent is more likely to end up in jumping into said hole.

Okay, so that’s just me. I have bad days. Pray for me.

Anyway, what I mean is that when a homeschool is run correctly, more than half the day is wide open. That leaves a lot of time for a student to delve deep into a topic that interests her. Take our son, for example. He has been into animals since he was about two years old. Bu the age of eight or nine, he could tell you more about life science than your average schooled twelve-year-old because we had read him so many books on the subject!

There you go. Seven benefits of homeschooling. But I’ve probably missed a homeschooling advantage or two, so use your noggin and come up with some yourself.