Showing posts with label gardening. Show all posts

Sunday, May 15, 2022

Think You Have A "Brown Thumb"? Think Again!

 Of all the excuses people make not to start a garden, one of the most prominent ones is, "I have a brown thumb."

(For any smart aleck that comes to this post, no, I'm not talking about skin color. Clear? On with it, then.)

I have a newsflash for those people. For you, if you're one of the guilty party.

Nobody has a brown thumb.

To claim the proverbial brown thumb is to claim complete ineptitude and incompetence when it comes to growing plants. You tried growing impatiens in your front yard, or bought a handful of houseplants, and they all ended up dying weeks or months later. Therefore, you don't have what it takes to grow plants.

Let's take that logic to its bitter end, shall we? A three-year-old tries to learn to read, but struggles to remember which letters make which sounds, or how to blend them together. After trying valiantly for a few months (probably at an ambitious parent's insistence), he still can't read. Therefore, he is incapable of ever learning to read.

A man who can't carry a tune in a bucket and who has no sense of rhythm takes a few dance classes, but three months later still can't find the beat of the song that he's dancing to. His partner always has to count for him. 

He must be hopeless. He wasn't born to dance, and should just give up before the rest of the dance class members laugh him out the door.

Those are real examples from my life. The first is my son, who is dyslexic and did not become a fluent reader until he was twelve. He now can read almost as fast as I can (and I'm a fast reader). The second is my husband, who did finally, after a lot of paying attention and practice, learned to dance to the rhythm of whatever song we were dancing to. 

How to turn your thumb from brown to green.

Like reading, or dancing, or gymnastics, or playing basketball, or knitting, or any number of occupations, gardening can be learned with practice and experience. Or, if growing your own food is too overwhelming for you to think about right now, maintaining a ficus tree or peace lily so that they thrive is a mere matter of practice and experience.

"I tried to grow such-and-such a plant, but it died."

So, it died. So figure out the reason it died. Too much water? Not enough? Insufficient lighting? Millions of living things die every second on this planet. It's part of the cycle of life. Something dying at your hand doesn't mean that you're a complete, hopeless failure. It means you learned something. You gained an opportunity for wisdom and knowledge.

And next time, you'll do better. 

The key to turning your brown thumb into green is, as with any endeavor, not to give up. Keep trying. Start small. 

And...learn

Don't assume you know what a particular plant needs. Research it. Read books written by people experienced with those particular plants, and do what they tell you.

Then, observe. Tweak and modify their advice when necessary, because not every plant is the same, not every growing environment is the same. 

Be honest. 

You do not have a brown thumb, in the horticultural sense. No human being does. If you have tried growing things only to watch them die, likely as not it was your lack of experience and knowledge. Or, maybe it wasn't your fault at all. 

But if you're convinced you're a "plant killer," at least be honest about why you've up trying to grow things. Admit that you don't want to take the time to experiment and learn to grow plants well. Admit you don't want to go through the work of practicing the skill of gardening. Stop saying, "I have a brown thumb."

On the other hand, if this post has lit a fire under you and you realize that yes, you might actually succeed at gardening, then get out there and get growing!

Friday, May 13, 2022

What Is No-Till Gardening?


"No-till gardening? What is that? How can I garden without tilling the soil??!"

I'm always a little surprised when I encounter people with that question, because in my decade of growing vegetables, I never tilled the soil but one time.

And it really wasn't I, but my husband, and he used a hand tiller (a hand tool with three prongs on one end), not a rototiller. The only reason we did that initial tilling was that due to the thick clay soil where we lived at the time, the local organic gardening guru recommended tilling certain amendments into the soil before the first planting.

To his credit, he stated that this was the only time you should till your garden. However, I've discovered since then that even that little bit of tilling wouldn't have been necessary. I'll get to that in a moment.

The reason people till their backyard garden

If you think you have to till your garden every spring, there is one reason for it, and one reason only: it's how farmers have loosened the soil in their fields for millennium. It's the same reason people think they have to separate the crops they want to grow, planting all of one kind of vegetable down a long row.

People see how farmers grew their crops, and think they have to pattern their kitchen garden the same way.

What if I told you that if they were doing it right, not even farmers would need to till their soil? I'm not going to get into no-till farming, but I want to let you know that there is a small but growing movement of farmers learning and applying the no-till method of growing to their large fields.

Why tilling is bad for your garden

Native soil teems with healthy micro-organisms that are eagerly waiting to help plants get the nutrition and moisture they need. It also teems with earthworms.

Good stuff, right? But there's one more thing soil teems with, and it's not so good:  weed seeds.

Therefore, when you till soil...

...you disturb the fragile ecosystem within it. And if the micro-organisms can't do their work of delivering nutrients to the plants' roots, the plants won't be as healthy as they might have been.
...you chop up earthworms (that kills them. All those pieces don't magically turn into new worms).
...you compact the soil more than you loosen it (assuming you're using a tractor, rather than a broadfork or hand tiller).
...you bring to the surface weed seeds that would have otherwise stayed buried deep and taken years, even decades, to find their way to the surface and germinate.

The benefits of no-till gardening

The benefits of not tilling, then, are the opposite of all those problems: the soil ecosystem remains intact, the earthworm population (which provides awesome natural fertilizer to your garden) is not depleted, the soil doesn't get compacted by heavy machinery, and you don't end up with a hundred times more weeds to pull.

In addition, you save yourself the cost of a rototiller as well as the annual dreaded chore of tilling.

The final benefit is that you end up with much more nutritious soil, because of what you do instead of tilling to create loose, rich, loamy soil.

The how-to of no-till gardening

There are five steps to creating a no-till garden.

Step 1

Measure out thirty to forty-eight inch wide beds, up to ten feet long. Space each bed one to three feet apart.

You can build a border for these beds with pressure-treated or cedar lumber, or with rocks. Or you can leave them without a border. It depends on your circumstances and preferences.

When you create beds like this with space in between, you won't have to walk on the soil next to the plants in order to work with them. This means you won't be compacting the soil.

Step 2

Soften the soil by piling up organic matter into the beds, then letting it sit and compost for at least six months.

I detail how to do that in this post about building a permaculture raised bed.

Step 3

Leave no area of dirt uncovered. Fill in the spaces between your main food plants with flowers, herbs, clover, or wood chip or bark mulch.

You do this for two reasons. First of all, if you intentionally keep the dirt covered, nature won't work as hard to cover it with weeds. Second, the soil in between plants, even if not covered in mulch, will be shaded and therefore will stay cooler and more moist longer, even during a drought.

Step 4

Always leave some roots in the ground. In other words, at the end of a plant's lifespan consider cutting it off at its base and leaving the root in the ground. This will keep the soil micro-organisms happy. Whether or not you leave a certain root in the ground depends on the plant. For example, tomatoes are notorious for developing fungal diseases at their roots, so it's best to always pull those out at the end of every growing season.

On the other hand, consider leaving the roots of peas, beans, and lentils in the ground, because the nodules at the ends of the roots will continue to put nitrogen back into the soil.

Step 5

Continue to add organic material to the bed. If you get into the habit of using several inches of wood chips, bark mulch, leaves, and/or straw everywhere in the garden, this step will happen automatically.

Another way to add organic matter is to bury kitchen scraps and grass clippings around your garden crops as you accumulate them. Dig a hole six inches deep and with a diameter large enough so that the material you put into the hold can be spread out to a layer no more than two inches deep. Then, cover it back up.

Some gardeners, even those with small plots in a small backyard, will grow cover crops in bare beds, then after a couple of months dig them up and turn them over. A few months later, this material will have turned back into soil.

No-till gardening is a no-brainer!

I hope I've convinced you that no-till gardening is the best way to grow your own food. It may seem more labor-intensive at first, and maybe it is the first year that you build the beds. But as long as you follow the steps outlined above, in the long run this method of growing vegetables will end up saving you time and energy.

And your produce will be a lot more, um, productive. ;)

Monday, May 9, 2022

How To Build A Permaculture Raised Bed


 In order to answer the question of how to build a Permaculture raised bed, first I might need to explain the word "Permaculture." Decades ago, the word was formed from "permanent" and "agriculture." It refers to using techniques of growing food based on the behavior of, and patterns in, nature. For example, nature doesn't use pesticides or herbicides, and nature plants a diversity of crops within a small area.

Today, the meaning of Permaculture has been broadened to mean "permanent culture." The underlying question this lifestyle seeks to answer is, "How can humans live in a way that respects the other animals, the environment, and each other?"

So when I talk about a "Permaculture" raised bed, I'm talking about a garden bed that is built purely from what nature gives, not out of ingredients purchased in plastic bags from a garden center.

You may have heard the term "lasagna gardening." Same thing. ;)

Preparing the garden site

The first order of business is to prepare the garden site. Measure out the length and width of the bed. Raised beds are three to four feet wide, depending on how tall you are (I'm barely five-foot-three, so I prefer three-foot wide beds).

Keep the length of any raised bed you build to ten feet or below. It might seem more space-efficient to have one twenty-foot long bed than two ten-foot long beds, but trust this voice of experience: it's really annoying when you have to walk ALLLL the way down to the end of a twenty-foot bed in order to get to the next bed parallel to it.

Once you've figured out the size of the area of the new raised bed, cut the grass and weeds down within the area as short as you can. If there is a particularly well-rooted grass growing there, such as Bermuda, that you don't want to eventually grow up into your bed, the best thing you can do is to find another location for your garden.

If you have such grass everywhere, dig out as much of it as you can, three feet beyond the borders of where your raised bed is going to be. But a heads-up: you'll be fighting with the grass several times a year for as long as you continue growing food on that site.

If the site of the future raised bed is on a slope, or on uneven terrain, you may want to level it so that the frame will fit flush against the ground.

The frame

Next, you're going to build the walls for the raised bed according to the size of the area. If you don't have the tools, strength, or skills to do so, you can buy raised bed kits.

If you're going to build the frame from scratch, your next step is to decide what kind of material you're going to use to build the raised bed frame.

If you live in a mild-summer climate, and you have access to a bunch of rocks that are all around six inches high, you can build the bed border out of rocks. This isn't a good idea for hot-summer climates, as the rocks will heat up. That heat will transfer into the soil, causing it to dry up more quickly and perhaps making the roots of your vegetable warmer than they want to be.

Most people are going to use wood. It's certainly easier on one's back to handle than large rocks! Use either two-by-six cedar boards or two-by-six pressure-treated lumber that the bed borders will last for many years.

The most permaculturish thing you can do when using wood is find some scrap lumber if you can.

Saw the boards to the correct lengths, then screw them together at the corners.


Once this frame is complete, place it over the mowed area.

Sheet mulch time

Now it's time to sheet mulch the entire area inside the frame. This simply means that you're going to cover the entire bottom with either cardboard, or four to six layers of newspaper. This will prevent weeds from growing while you build up the bed, yet still allow earthworms to get through.

There's something else you need to prevent, too: moles and voles. To that end, cut out hardware cloth (wire mesh) that will cover the entire width and entire length of the bottom of the bed. When I built our latest beds, we had chicken wire leftover that had been used to protect baby trees.

The holes in chicken wire are big enough for either a mole or vole to crawl through, so if you use it you'll need to use two layers. Arrange the top layer so that the holes of the bottom wire and top wire will be staggered. That way, you'll create holes that are too small for the critters to get through.

(Two layers of chicken wire. The corners are being held down by rocks until organic matter is added into the frame.)

The layers

Finally, we get down to business! This last step is the longest and will take the most work. However, within six months to a year you'll have a bed full of rich, loamy soil that you didn't pay a single cent for.

I happened to have put a case of bananas into the freezer just after I got the chicken wire laid down, so I spread out the peel at the bottom.

(Beginning a lasagna gardening raised bed.)

I continued with rotting leaves that had sunk onto the bottom of a small pond we use for supplemental garden and orchard watering. Some shale around the pond had also been washed into the pond and sunk to the bottom, which is what is giving the leaves that sickly gray color.

(Rotting leaves form the second layer of this permaculture raised bed.)

It really doesn't matter whether you start with a nitrogen-rich layer or a carbon-rich layer, but I'm going to arbitrarily pick nitrogen.

So...gather up enough nitrogen-rich organic material – grass clippings, weeds, and/or food scraps – to create a layer around three inches thick at the bottom of the bed. Next, scavenge up carbon-rich material: shredded paper, pine shavings, wood chips, or dried leaves. Pile them up evenly over the green material, six inches thick.

Keep on layering the organic material this way, alternating  nitrogen-rich and carbon-rich materials. This layering method is why it's commonly known as "lasagna gardening". As when you prepare the pasta dish called "lasagna," you alternate layers of the different ingredients.

Do your best to layer on two parts carbon-rich materials to one part nitrogen-rich, as the materials will compost more quickly if they are used in these proportions. However, if you have mostly grass clippings or mostly dried leaves available, you can pile them up and still eventually end up with the same result. But the material will take longer to compost, and if it's nitrogen-rich material, it will stink in the process!

We used to live in north Texas, where the native soil is thick clay. Even after tilling in the amendments recommended by the local organic gardening guru, my vegetable garden soil was still hard to work with.

So, one fall, I collected all the dried leaves I could from neighbors, piled them a foot high in the garden bed, and covered them with cardboard and bricks so they wouldn't blow away. By the next spring, I had two to three inches of much richer, softer soil. So you don't have to mix the carbon and nitrogen materials in order to end up with beautiful compost at the end.

(Weeds and grass clippings top the layer of leaves.)

Keep on layering the materials as high as you dare. Accomplish this by heaping up the materials several inches above the six-inch edge of the Permaculture raised bed frame in the center of the bed, then have the materials gradually sloping down toward the edges of the bed.

If you have finished compost on hand, plop that on the very top. If you don't, cover the bed either with biodegradable black plastic or with cardboard. Weight your cover down with bricks or rocks so they won't blow away.

Finally, let the earthworms and microbes do their thing. Give them at least four months to break down the organic matter. The longer you wait, the more of the matter will have broken down; however, if only a third of it has composted and the rest of the matter is in various stages of breaking down, you'll still be able to grow vegetables in it.

Enjoy the bounty!

That's how to build a Permaculture raised bed, or lasagna gardening bed. No shelling out big bucks for potting mix, or the ingredients for potting mix. No purchasing materials whose sustainability is debatable, such as peat moss or coconut fiber.

And what you'll end up with is a soil much richer in both nutrients and beneficial microbes than anything you can buy from a store.

Sunday, May 1, 2022

I didn't know they were THIS hardy!

Anyone who's been vegetable gardening for more than a couple of years has a good handle on some of the hardier plants. They include many herbs, such as oregano, parsley, and peppermint. They include certain greens, such as kale, Swiss chard, and corn lettuce. Some are hardy because of their resistant to below-freezing temperature. Some are drought-hardy. Some are both.

But of all the types of plants that come back year after year, regardless of how cold the winter, regardless of how little water they get, one type of plant you never hear about surviving very long: fruit-bearing plants that have been confined in a container whose soil has been allowed to dry up.

But I recently discovered differently. I recently discovered that strawberry plants, grown in containers, can miraculously come back to life after being completely neglected during a drought.

As a last ditch effort to protect our strawberries from being eaten by rodents, I had my husband build long boxes several feet off the ground. He lined them with leftover pond liner and filled them with potting soil, then planted in brand-new strawberry plants.
Being new plants, and in disease-free soil, the theory was that they wouldn't get anthracnose. However, the plants must have contracted the fungus in the nursery, because the very first berries they bore showed signs of the disease.

I was ready to give up on them by June. But I had my husband continue to water them. Because maybe if we started spraying early the next spring, we'd be able to keep the anthracnose at bay, at least until we harvested a few pints of berries.

However, we're off the water grid, and most of last year any rain that was forecast went around us. The water in the small pond he was using for the strawberries disappeared much more quickly than it had since my husband first dug it out.

I regretted putting the plants in containers, because strawberry roots in the ground can survive a drought. Not so when they're in a container. You can even see the new shoots from last summer and fall that tried to get to the ground, and didn't make it, that they eventually dried up.

Of course, that was going to happen to the plants in the boxes, as well.

Or, so I thought. Because that's what the gardening gurus say. And, indeed, by the time autumn arrived, every single leaf had dried to a crisp. I was certain that the roots had dried up and died, too. A few of the new shoots made it to the ground, rooted in in time, and survived. But many of the shoots dried up before they could find their way into the soil.

Well, watch the video below and look at the strawberry plants now. 


Check out the green leaves. The flowers. The baby strawberries. Granted, since the two sleet storms in February, we've been getting more or less the amount of precipitation that is normal for this area. Still, that usually hasn't amounted to more than an inch a week. Not nearly enough for containers, especially for the ones on the bottom, and sometimes it's been ten days between rain showers.

Turns out, strawberry roots can survive a certain amount of drought. And the actual plants don't need nearly as much water as we thought in order to bear fruit. Of course, they'll produce more and better quality fruit if they get water on a regular basis, so we're going to start taking care of the plants. We've even begun a natural fungicide regimen that we hope will delay, if not prevent, the anthracnose that always has ended up ruining more than half our potential crop.

And after the plants are finished bearing fruit for the season? We're not going to water them nearly as much as we have been. Just enough to keep the roots alive, and at least some of the leaves green.

As for the ones growing in the ground? I'll never worry about them again.

Happy strawberry gardening. And remember: the gurus don't always get everything right.


Tuesday, April 26, 2022

Easy To Grow Vegetables For First Time Gardener, Part Two

 In part one of Easy To Grow Vegetables For First Time Gardener, I explain how to grow lettuce, kale, and potatoes (grown in mulch). A beginning gardener should start slowly and small if they want success, if they want to feel competent in their gardening endeavors. And those three crops make success with growing your own food an easy achievement.

Which vegetables should you try growing once you've got those three down? How about beans, cherry tomatoes, Egyptian (walking) onions, squash, and cucumbers?

Remember that the soil should be enriched with organic material before you begin. And, except for the onions, all of the crops I'm going to discuss in this article require six hours of sun per day.

Also except for the onions, they will be killed by even a slight freeze (frost tender), so plant them out a week or two after the last average frost date for your area.

Beans.

Bush beans. Pole beans. Chinese long beans. Dried beans.

There is a variety of bean for everyone, and none of them require much more than proper watering, correct spacing, and a little pest control to get them producing so much that you risk getting tired of picking beans! They also are beneficial to the garden soil, as well. Legume plants – namely, beans, peas and lentils – fix nitrogen into the soil, helping feed the other plants growing near them.

I'm going to focus on green beans here, though the principles of growing them generally apply to all types of beans.

First of all, in my experience it's easier to grow bush beans in the north, and pole beans in the South. Pole beans seem to take the heat a little better, and I haven't had the pest problems on my pole beans as I have with bush beans.

Pole bean growing up PVC pipe in raised bed.


That said, I've read that you can prevent the Mexican bean beetle on bush beans and the Colorado potato beetle on potatoes if you interplant bush beans and potatoes together. That's an experiment I might try one day.

If  you're using the Square Foot Garden method of spacing, the SFG gurus will tell you that you can plant nine bush beans in a square foot. In my experience, that's too many. Four or five per square foot allows the plants much more room to breathe, and diminishes their risk of getting a fungal disease (which, by the way, I don't think I've ever seen on my pole beans).

If you're planting pole beans, they need something at least six feet long to climb up. A cheap and easy thing to do would be to push short sticks into the ground, three or four inches apart, then on each stick, tie one end of a six-foot long piece of string. Pull the string tightly at an upward slope and tie the other end to the top of a fence post, tree branch, or trellis that you're using to support other vegetables. The pole beans will wind themselves around the string as they grow.

Otherwise, stick some kind of six-foot-tall pole in the ground, one per bean. Space the poles three to four inches apart and plant each bean seed right next to the pole.

Most beans require regular watering. When the top two inches of soil are dry, they need water. This isn't true for all beans, however. For example, I know from personal experience that both mung beans and Chinese long beans are highly drought-tolerant. When we have several weeks of 95+-degree temperatures (that's Fahrenheit) and no rain, I've only needed to give these kinds of plants about a half gallon of water each once a week (even once every other week).

Cherry tomatoes.

It might surprise you to see tomatoes in a list of easy to grow vegetables for beginners in the garden. Some expert growers say they're a more advanced crop, probably because of all the diseases and pests that can take them down.

Others claim, if you have healthy soil, growing tomatoes is a snap.

The truth is somewhere in between. However, if you want to reduce the risk of disease on your tomato crop, have a crazy prolific harvest – even in temperatures above 90 degrees (F), when the blossoms of many tomatoes turn sterile and fall off – and reduce the risk of tomatoes cracking (and thus rotting) before they get ripe, cherry tomatoes are what you're looking for.

Cluster of cherry tomatoes within plant.


Start the seeds indoors two months before the last average frost date plus two weeks, or buy cherry tomato seedlings from your local nursery.

Tomatoes are fairly heavy feeders, so even though you're planting your veggies into rich soil, throw a couple of banana peels into the hole where you're going to plant a tomato.

Most gardening experts advise you to keep tomatoes pruned down to one or two main stems. Instead, you could plant your tomatoes every three feet, and either tie them to a trellis every vertical foot or so as they grow, or have them grow in a sturdy cage where they spread out as much as they want. I've done this before, but tell you what: you end up with this huge mass with tons of tomatoes hidden inside that end up rotting. So you might as well take the bit of time to prune your tomato plants every week or two.

If you want to keep the plants pruned to one or two stems, inserting a stake about a foot into the ground, and at least five feet above ground, then tying the plants to it as they grow will be sufficient support for the plants.

In the beginning, tomato plants appreciate a decent amount of water (like the beans), but as they grow and get established you may be able to get away with giving each plant a gallon of water every other week.

Cucumbers.

Cucumber plant growing over cardboard mulch in high raised bed.


Cucumbers are another controversial crop. Are they an easy vegetable to grow for first time gardeners? Many say no, because they are so prone to fungi in humid climates.

So, buy varieties that are resistant to powdery and downy mildew. Or, plan to plant a new cucumber plant every three to four weeks, up until two months before your area's first average frost date in the fall. That way, when one plant succumbs to a disease, you've got another one ready to go.

Pick off, or spray with orange oil or diluted liquid castile soap, any cucumber beetles you see before they have a chance to spread disease.

Finally, cucumbers are thirsty plants, and would prefer that the soil around the roots stay moist at all times. They would appreciate a gallon of water every other day, perhaps every day, during the hottest time of the summer. The exception would be if the plants are surrounded by six inches or more of wood chip mulch. In that case, they won't need to be watered as often.

Either way, cucumber plants let you know if they're not getting enough water by turning the fruit bitter.

Squash.

Butternut squash fruit lying on a very long vine.


Both winter squash and summer squash are generally easy to grow vegetables for beginners. They need the average amount of water, and the average amount of fertilizer.

HOWEVER.

The big caveat with squash being an easy vegetable is that it has two major predators: the squash bug, and the squash vine borer.

The squash bug isn't found everywhere (for example, Minnesota gardeners have never heard of the squash bug), so you may not have to worry about it.

But if you do live in a place where squash bugs abound, they can take down a zucchini plant pretty quickly. Some people take a hand-held vacuum out to their garden and regularly vacuum them up. Peppermint essential oil repels them, so you might try spraying the plants once or twice a week, either with peppermint oil diluted in water, or with peppermint liquid castile soap.

Be aware, however, that both peppermint oil and soap will kill beneficial insects, so spray early in the morning or just before sunset you don't kill anybody you don't want to kill.

One year I planted a borage next to a zucchini, and didn't have any squash bugs that year. So you might try growing a variety of aromatic herbs around whatever kind of squash plant you decide to grow.

The squash vine borer is a bit trickier, as the mama moth lays its eggs on the stem of the squash vine when you're not looking. When the larvae hatch out, they eat their way in and through the stem, quickly killing the plant.

Squash vine borers don't bother butternut squash plants, which is why it's the only winter squash I grow now. For other varieties of winter squash, bury a few inches of the vines for every foot they grow to discourage the moths from laying eggs.

And just like with the squash bug (or any insect pest, for that matter), surrounding the plants with a variety of herbs and flowers will make it harder for the moth to detect the scent of the squash vine.

Egyptian, or walking, onions.

Walking onions gone to flower in late May, southern Oklahoma.


Walking onions have to be number one on the list of easy to grow vegetables for a first time gardener. Why am I writing about it last, then? Who knows? Probably because I don't use them that often, and so they stand around in my garden, bored out of their little onion minds.

If you like cooking with onions, and you don't grow anything else, grow these. Plant the bulbs once, and you'll never plant them again. Not only that, but they'll also slowly spread into other parts of your garden of their own volition, and without asking permission.

You can cut the tall, green stalks off any time before they develop flower heads (when the temperatures head up toward 80 degrees F in the spring or summer) and use them raw in salads, or cooked in any dish that you want to add onion flavor to. When the onions go to flower, the stalks get tough and are only good to use as flavoring in broth or soup.

You can also harvest the little bulbs that form once the flowers go to seed. But hurry! The stalks are going to bend to the ground in order to plant the bulbs to produce new green stalks. This is why they're called "walking" onions. They seem to change locations all by themselves, when really they're just replanting themselves. Cool, huh?

Seed head of Egyptian onion, or walking onion. The tiny bulbs have already started growing new green shoots.

Ready to grow?

Now you know the eight easy to grow vegetables for a first time gardener. So, what are you waiting for? Get your garden plot ready, and get growing!

Monday, April 25, 2022

Three Gardening Hurdles That Are Easier To Jump Over Than You Think!

Search online for "how to start a vegetable garden," and you'll find an abundance of advice. You'll be told to start a compost pile, build a raised bed in an area of your yard that's in full sun, set up a watering system.

All that advice is well and good, but it largely ignores one thing: not everyone has the perfect circumstances to build a perfect garden (which doesn't exist, by the way, no matter what Instagram leads you to believe!). In fact, many people who truly want to grow their own food, at least a portion of their vegetables, run into snags early on in their endeavors. 

I'm going to address three of the most common hurdles that keep enthusiastic would-be gardeners from getting started, and show you how they're not as difficult to overcome as they may seem at first glance.

First hurdle: Not enough space.

Perhaps you rent a house, and your landlord/lady has forbidden you from digging up the yard. Or you live in an apartment. Or both your front and back yards are the proverbial postage stamp-size. 

For the last one, check out my post about gardening ideas for tiny backyards. For the others, container gardening is the way to go. Even if you live in an apartment that has no deck or balcony, you can set up a few pots in the bathroom, the corner of the living room, or the closet with grow lights hanging above them. When I lived in a condo, I had a few pots outside on my balcony, and against my dining room wall I had a plastic utility shelf with fluorescent light fixtures attached to the bottom of a couple of the shelves and grew herbs in pots underneath the lights. 

It would be fifteen years before I'd learn that one can be self-sufficient in lettuce by growing it in a similar way, semi-hydroponically.

Second hurdle: Not enough money.

Watch a dozen random videos about growing your own food, and you'll come away thinking that gardening is an expensive endeavor. While it can be, it certainly doesn't have to be, especially if you're not in a hurry.

You can find garden tools at a discounted price, or even free, on places like craigslist or freecycle. There, you can also find cast-off lumber to use to build raised beds. 

But raised bed borders are a convenience, not a necessity. You can build up a borderless raised bed simply by gathering and piling up leaves and other organic matter until you have a good eighteen-inch pile, then placing broken-down cardboard boxes on top of it all and weighting the cardboard down with rocks or bricks. Wait a year - two is even better - and you'll have rich, nutritious soil in which to plant seeds and seedlings. 

Speaking of seeds, if you don't even dare shell out to purchase those, ask your gardening neighbors or your social media acquaintances to give/send you some. 

Gardening will cost you some money, at least in watching your water bill go up in the summer. But it certainly can be done on a budget.

Third hurdle: Not enough time.

If you're reading this blog post, you have enough time to garden. 

Seriously. 

Because, if you worked sixteen hours a day, you wouldn't have time to mess around with researching vegetable gardening online, or fiddle around with social media, or watch Netflix. I must therefore conclude that you work the typical eight- to ten-hour day, and typically have two days off per week. 

You. Have. Time. To. Garden.

It's a matter of priority.

Ever heard of Nora Roberts? The author who cranks out four number-one bestselling novels every single year? She writes Monday through Friday, about eight hours per day. And when the weather warms up, she gardens.

On the weekend. Only.

It's a hobby she enjoys, so she makes time for it on the days she's not committed to working on her next blockbuster novel.

Whether you want to take up gardening as a hobby, or save money on your grocery bill by growing some of your own produce, or even make supplemental income with a market garden, you have plenty of time to do it.

As long as you prioritize. 

A basic backyard garden requires fifteen to thirty minutes a day of maintenance. That's it. If you can't carve out that much time, or dedicate a few hours on the weekend, for weeding, mulching, watering, harvesting, and pest control, you really don't want to garden. 

**********

There you have it: the three most common hurdles to growing a vegetable garden. Now you know that they aren't nearly as high as you originally thought.

Get out there, and get growing!

Sunday, April 24, 2022

Easy To Grow Vegetables For A First Time Gardener, Part One

 Which are easy to grow vegetables for first time gardeners? The question is debatable, partly because the answer depends on which climate you live in. But unless you live at one of the poles or in a tropical area, there are several vegetables that are generally easier to grow than others.

In this article, I'm going to talk about the three that beginning gardeners should start with. Why only three? Because when you start small and slow, then you have much more success, and you're much more likely to keep gardening next year. And, this would be a super-long article if I had all eight in it. ;)

But in the next article on the topic, I give you five more.

Get the basics down first.


If you're serious about growing your own food, you have to prepare your garden correctly before you sow any seeds or transplant any seedlings. If you don't, trying to grow even the most forgiving of vegetables can end up being an exercise in frustration.

The first thing to do is to make sure your vegetable garden site will receive at least six hours of sun for fruiting plants (tomato, squash, cucumber, pepper, etc.), and at least four hours of sun for leafy plants and root vegetables such as carrots and turnips.

The second thing is to make sure your soil is well-amended. Avoid tilling it at all cost, because that disturbs the soil biology which help your crops to be healthy and produce the best they can.

How do you avoid tilling? Cut the grass or weeds covering your garden site as short as you can, then layer cardboard or several layers of newspaper over the area. Water this paper layer, also known as "sheet mulch", then on top of that pile six to twelve inches of whatever kind of organic matter you can get your hands on – dried leaves, grass clippings, compost, kitchen scraps, seed-free weeds, and so on.

Water every time you've got three to four inches piled up, and water again just before covering it.

Cover it up with either more cardboard, or biodegradable black plastic mulch, using rocks or bricks to weigh them down. This will keep weed seeds from falling into the organic material, and will keep mice from building nests inside it.

If you use the black plastic, it will have the additional benefit of helping the organic matter underneath it to break down more quickly.

After a four- to twelve-month period, depending on whether you used the black plastic and what kind of material you used on top of the sheet mulch, the organic matter will have turned into soil. This soil will be rich with nutrients and soil micro-organisms, as well as be easier to work than the native soil.

Now that you know how to prepare a garden bed that will produce happy plants, let's get onto the first three easy to grow vegetables for first time gardeners.

#1: Lettuce.

Red romaine lettuce growing in mulch.


Lettuce is a cool-weather crop, and will take a freeze down to about twenty-five degrees Fahrenheit. If you live in a mild-summer climate, you may be able to grow crispy, sweet lettuce all summer.

If you live in a hot-summer (mostly 85-degree-Fahrenheit and hotter temperatures) climate, you have to plant the lettuce two months before the consistent eighty-degree-plus temperatures hit, or it will bolt and get bitter before you have a chance to harvest it.

On the other hand, you'll be able to grow lettuce from late fall to early winter, and late winter to mid-spring. Years when you have a mild winter, you'll be able to grow lettuce all winter long.

Sow seeds or transplants three to four inches apart. If you sow seeds, sow them one-fourth to one-eight inch under the soil's surface. Also, you'll need to keep the top of the soil moist until they germinate. This is true of any kind of seed that you sow.

In addition, until they're about three inches tall, seedlings of any kind of plant need more frequent watering than the larger plants (say, when the top half inch of soil or less has dried). So do transplants. Since they need a week or two for their roots to get established, water them the same as for small seedlings.

The one trick to growing lettuce is to keep the soil slightly moist at all times, even when the plants get mature. If lettuce doesn't get enough water, the leaves might turn bitter even before the plant begins to bolt. So every day or two, go out and test the soil where your lettuce is growing, and give your plants some water if the soil has gotten dry a half inch deep. Mulching around the plants with wood chips will help keep the soil moist.

Misting the plants every day will also ensure they don't bolt prematurely. Use a pesticide sprayer, or, better yet, irrigate them with a sprinkler.

If slugs are a problem where you live, sprinkle diatomaceous earth around the plants once or twice a week, or after it rains. Or you can use the old beer trap. Sink shallow containers (such as lids to storage containers) into the ground and fill them with beer. The slugs like beer better than anything you have in the garden, and will drown themselves trying to consume it.

#2: Kale.

A kale plant that volunteered in our front yard a few years ago. Turns out, the rabbits don't like it!


Kale is one of the easiest vegetables for beginning gardeners because it is so low-maintenance. It is cold-hardy, somewhat drought-tolerant and has only three pests that I know of: grasshoppers, aphids, and cabbage worms. I'll get to them in a minute.

In my experience, kale can survive temperatures as low as the mid-teens (F), and can tolerate warmer temperature than lettuce before bolting. If you live in a hot-summer climate and want to grow kale in the summer, you may be able to prevent it from bolting by planting it in an area where it won't get afternoon sun.

Sow seeds about a quarter inch deep, or plant transplants, about a foot apart for bushier kale varieties. Dinosaur, or lacinto, kale can be planted four inches apart because their growth habit is more narrow.

If you're an urban or suburban gardener, the only pests you're likely to have with kale are aphids and cabbage moths. Both urban and rural gardeners can prevent an aphid infestation in one of two ways.

First, they can make sure not to grow kale into the hot summer weather. Or, as I stated earlier, grow your leafy greens in a place where they will get morning sun but afternoon shade.

Second, grow sunflowers around the edges of your garden. Above all other plants, aphids love sunflowers the most. Even better, aphids can't harm sunflowers as they can your dark, leafy green crops.

If all else fails, you can spray the plants with a liquid soap solution (one tablespoon soap per gallon of water) every day until the aphids appear to be under control.

Grasshoppers are the bane of a rural gardener's existence when it comes to the cabbage-family crops such as kale...especially for vegan gardeners, who won't have any chickens around to eat up the bugs. If you're vegan and live in the country, your young kale will probably be eaten down to the ground before it even has a chance to grow.

How to prevent this destruction by this eternally hungry insect? Cover your kale.

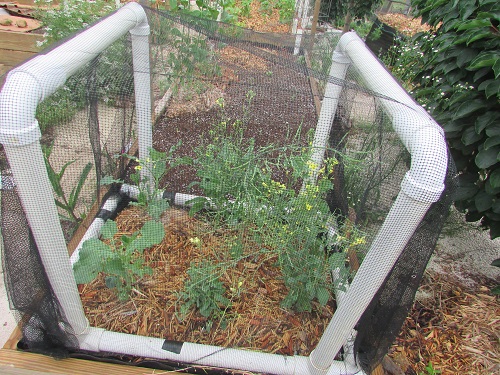
Kale growing under one of our PVC-beetle netting cages.


We have three two-by-three-by-three-foot cages made of PVC pipe and beetle netting. This covers six square feet of kale and will keep both the grasshoppers and cabbage moths away.

Or, you can bend 1/2-inch PVC into hoops, attach them to sides of a raised bed (or insert them over pieces of rebar stuck into the ground), then cover the hoops with lightweight row cover.

Once the plants grow to at least five inches high and the leaves start to grow to hand-width proportions, you can uncover them if you want. The grasshoppers will still eat them, but you'll end up with just a hole here and there rather than the entire plant disappearing overnight.

You may, however, still end up with cabbage worms if you uncover them. Then you'll need to either check for them every three days or so, and if you find any, either pick them off by hand or spray them with peppermint or orange essential oil diluted in water.

#3: Potatoes.

If you've read a typical gardening book that explains how to grow potatoes, you might not think it's a particularly easy to grow vegetable for a first time gardener. Well, that's because most gardening books make it sound like rocket science, with all the constant digging and hilling to make sure the greens don't overgrow to the detriment of the tuber production (because if you don't reduce the green growth, the plant will put its energy into producing more greens, rather than tubers).

The same books tell you not to plant potatoes until all danger of frost is passed.

But there's another method that make growing potatoes a piece of cake. That method is to bury the seed potatoes in mulch. Here's how you do it.

First, set an entire seed potato on top of the soil.

That's right, you don't need to cut it up.

And when I say to set it on top of the soil, I'm assuming it's well-amended and therefore nutritious. If not, you should put a couple inches of compost on the soil first, then set the potato on top of the compost.

Second, cover the potato with eight to twelve inches of straw or wood chips (definitely twelve inches if you're using straw, as it's not as dense as the wood chips and will decompose more quickly).

Third, walk away.

That's it. No watering, no "hilling." After a month or so, start checking to see if any green growth has emerged from the mulch. About two months from piling the mulch on top of the potato, carefully pull back some of the mulch to see how big the tubers are. You can harvest them as new, small potatoes, or let them grow larger.

Speaking of frost...When you plant potatoes under mulch, you can plant them before the last average frost date. In fact, in some areas you can bury the potatoes in mulch in the fall, and then harvest them the next spring.

You just have to be careful if you plant them while your area is still experiencing freezing temperatures. If the greens pop out of the mulch, a freeze will kill them off, and that may or may not destroy the sprout. More greens may grow back once it warms up again, but it's not a guarantee.

On the other hand, if you plant potatoes in late summer and they mature sometime around the first frost of the year, you don't need to harvest them all, as you'd have to if you were growing them in soil. But you might want to throw some extra mulch on top of them to be sure they don't get frost damage while they're waiting for you to harvest them.

Perhaps the best part about this method of growing potatoes (also known as the "Back To Eden" method) is the harvesting. No digging into the dirt! No messing up your hands or gloves, no accidentally breaking potatoes with a shovel. All you have to do is remove the mulch.

Some potatoes may grow into the soil, but not many, and not very deep.

*********

There you have it! Three easy to grow vegetables for a first time gardener! Click here to read about five more such crops.


Happy homesteading. :)


Saturday, April 23, 2022

Spring Cleaning In The Garden

 I did it again.

I let the weeds get away from me this spring. It's just so hard to get motivated to get out and hoe and pull weeds in January and February (yes, where we live, weeds can and do germinate and grow that early), even March, when it's so cold. And this winter, I'd convinced myself that I didn't care if the garden became overrun with weeds.

Well, come the beginning of April, I did care. I especially cared that the weeds were consuming all the nutrition out of my new-ish lasagna beds. They were also preventing me from seeing baby stalks of asparagus, the only food that will come out of the garden this season, that were sprouting up.

So I decided I would at least weed the asparagus area.

Here are the before photos. This first bed is supposed to have asparagus in it, but alas, last spring when I planted in the seedlings the organic matter in the bed hadn't composted fully enough for the roots to get established. They all died or were eaten by grasshoppers within a matter of weeks. 


Here, in the following photos, is the area again. After I weeded the two lasagna beds, my husband piled up some mulch inside them. Eventually, we'll add more mulch around the other asparagus plants as well, as much the existing mulch has turned to soil. 

Notice how much easier it is to see the asparagus. Of course, there is a lot more growing now than when I took the first pictures, as it took at least a week for me to complete the weeding. 


They're hard to see, but there are several tall stalks of asparagus growing in the bed in the foreground.


Except for the dandelion, the green growing out of the mulch are asparagus stalks.

SUPER hard to see, but there are a few small asparagus stalks growing in this picture. Most are purple.

***********

Lesson learned: don't be lazy in late winter! I need to get out and hoe up the weed seedlings before their roots get established.

Thursday, April 21, 2022

The EASIEST Way To Grow Sweet Potatoes, EVER!

  If you’re wondering how to grow sweet potatoes, you’re probably interested in knowing how to grow them in the least labor-intensive way. What is the easiest way to grow sweet potatoes?

The usual way.


There are two typical ways that people grow sweet potatoes. The first is, after all danger of frost has passed in the spring, they cut up pieces of sweet potato that have been sprouting inside and bury them in several inches of dirt, one piece given about one square foot.

The other usual way is to get some sweet potatoes seriously sprouting indoors a couple of months before the frosty weather ends by placing potato halves in containers of water, about third of each half submerged in the water. Eventually, the part of the potato above water is covered with baby sweet potato plants. Supposedly, if you carefully remove these, taking care to dig down into the potato underneath each plant, and then stick these babies into the ground, they will eventually produce tubers.

I tried it one year. It didn’t work.

And then I learned about…

The easy way.


What if you could grow sweet potatoes in such a way that you didn’t have to dig up dirt to plant them, never had to water them, not even during a drought, never had to fertilize them, and hardly had to dig down into the soil to harvest them?

You can. I discovered it several years ago. All you need are some sweet potatoes and a bunch of wood mulch, which is relatively inexpensive and easily available at any place that sells garden supplies. I use sweet potatoes from the previous harvest if I have any. Otherwise, I just buy sweet potatoes from the store. They don’t always sprout, however, because the non-organic ones are sprayed with an anti-sprouting chemical after being cured. So if you want to be sure of a bumper crop and don’t have your own seed potatoes to plant, buy some seed sweet potatoes from a seed company.

You need a spot that gets full sun, at least six hours per day. You’ll plant the tubers a foot apart, so plan accordingly.

Here’s the awesome news: you don’t need a garden bed. You can do this right in your lawn if you want! Just understand that if you do, and there are night critters around that dig like we have, you might lose some of your crop that way.

All right. So, you have your space. About a month before the last frost, place a whole potato on the ground. Just on the ground. Not in a hole. On the ground.

A foot farther away, place another. And so on, until you’ve planted them all.

Finally, cover the entire area with eight to twelve inches of wood mulch. In a few weeks, you’ll start seeing little stems and leaves emerge from the mulch.

If you get absolutely zero rain within a three-week period, you might want to give each plant a half gallon of water. Otherwise, plan on not needing to water.

By mid-October to mid-November (depending on how warm your climate is), the sweet potato area will be a mess of vines. And the tubers will be ready to harvest. Cut back the vines to where you can find the base of each one, and start pulling back the mulch.

Some of the tubers will be sticking out of the mulch. Some will have grown down into the dirt, so you will need a shovel. But you won’t need to dig nearly as deeply or as much as you would planting sweet potatoes the traditional way.

How big will the harvest be?


I can’t say exactly, but I can tell you this: five pounds of sweet potatoes per tuber planted is on the slim side. In the past, I’ve had a mere three plants fill two large boxes with the harvest.

No cutting up tubers, little digging, little watering, no fertilizing. Yep, I’d say that’s the easiest way to grow sweet potatoes, ever!

Saturday, April 24, 2021

Six Home Vegetable Garden Ideas For Tiny Backyards That You Can Implement TODAY


 When your space for growing your own food is limited, any home vegetable garden ideas that will make your garden more productive are worth looking into. I know, because we used to live in a suburb and had the proverbial postage stamp-sized backyard.

In this article, I want to give you six ideas that most people with limited growing space – whether you have a tiny backyard or an apartment balcony – can put into practice starting today.

Idea #1: Trellis everything that can be trellised

You may already know that peas require a trellis to grow up, and that cucumbers like to climb up trellises.

But did you know that you can trellis many types of melon and winter squash varieties, as well? The trick with doing that is to trellis only the smaller varieties – say, those that are cantaloupe-size at maturity – and then when the fruit grows to be about the size of an orange, to wrap it up and attach it to the trellis so the weight of the fruit doesn't make it fall off the vine before it's mature.

You can use netted bags such as what lemons and onions typically come in at the store, or you can use old pantyhose. Basically, you need a material that will stretch as the fruit grows, and that is strong enough so that it won't break.

Idea #2: Mount shallow containers to a fence.

YouTube is replete with ideas on how to grow things in gutters attached to fences or the outside of apartment walls. Below is one.

https://youtu.be/wqIU_elcngI

I will say, if you either live in a hot-summer climate or don't want to be constantly irrigating the soil, you might want to use plastic window boxes instead. They are deeper than gutters, and so hold more soil and thus won't require watering as frequently as gutter gardens do.

Idea #3: Grow greens in pots on a metal shelf.

This home vegetable garden idea is a great way to take advantage of vertical space, especially if you don't have a fence or wall that you dare attach gutters to. The metal shelves that are available at Big Box stores are coated so that they won't rust, so you can leave them outside season after season.

Level a spot in your backyard garden that gets at least six hours of sun, buy one of the shelving units, and assemble it on the level spot. Then, cram each shelf full of pots of lettuce, herbs, kale, whatever.

Because the spot will get sun for most of the day, all of the plants – even those on the lower shelves that are more shaded – should get enough sun for greens to grow.

That said, if you use small enough containers to have three rows of them on each shelf, forego that idea. To make sure all of the plants get enough sun, only have two outside rows, and leave the middle of each shelf empty.

Here's an irrigation hack for such a set-up: Buy a shallow plastic storage container at least thirty inches long for each shelf. Cover it with either three layers of lime-green landscape fabric or panda film to keep the plastic from getting sun damage.

Plant your plants in small grow bags – a one-gallon bag for each lettuce, a three-gallon bag for each kale – and set the bags inside the shallow boxes.

To irrigate, simply keep about two inches of water inside each plastic box. Shake up fifty drops of orange oil per gallon of water to instantly kill any mosquito eggs that get laid inside the boxes.

Idea #4: Utilize interplanting wherever possible.

This is one of the easiest, yet least-used, of the home vegetable gardening ideas for small spaces. Interplanting is when you either plant narrow-growing plants with wider-growing ones, such as carrots in between heads of lettuce, or early harvest crops with later harvest ones, such as radishes in between tomatoes.

A related trick, if you live somewhere where the summer temperatures average well above eighty-five degrees (F), is to plant smallish, cool-weather plants to the north of large, warm-weather plants.

For example, if you have four tomatoes growing in a row, plant a lettuce or two on the north side of each tomato, and the tomato will protect it from much of the hot summer sun rays.

Idea #5: Use a stackable planter.


The brand really does matter if you decide to invest in one of these, because the cheaper ones don't allow for even irrigation all the way to the bottom of the structure.

However, if you want to significantly increase the number of plants you grow in a very small area, investing in a quality stackable planter, such as the kind you can buy from greenstalkgarden, might end up being the perfect solution for your backyard garden.

Idea #6: Grow in nooks and crannys.

When we lived in the suburbs, I grew things under bushes in the corners of the yard and along the fence. I also let cilantro and red malabar spinach, both being plants which freely reseed and come back year after year, grow wherever they popped up as long as they were close to the back patio or other area that we didn't need to keep mowed.

You can grow lettuce in the partial shade of bushes. You can grow a tomato in a five-gallon bucket next to a porch or balcony post that you can easily tie it to as it grows. Does the place where your hose connect to the outside faucet drip when the water is turned on? Even if it only drips once every few seconds, a water-loving mint plant might flourish there.

Your imagination and ingenuity are the limit!

When it comes to home vegetable garden ideas for tiny spaces, there are probably at least as many as there are small backyard gardens. Try a couple of the above ideas, and see where your own ingenuity takes you!

Happy (small space) gardening!

(If you enjoyed this article, please pay it forward by pinning the graphic at the top of the page to Pinterest. Thanks very much!)

Saturday, May 19, 2018

The EASIEST Fruit To Grow EVER! (How And Why To Grow Goumis)


Ever heard of goumi berries? No? Welcome to my world about seven years ago and prior. I first heard of them on a prepper podcast where the podcaster was listing different fruits to try growing. Being into permaculture, his emphasis on the bush that produces them was that it fixes nitrogen into the soil, as do legume plants. 

Three years after planting my own four sticks labeled “goumi” into the orchard, I’ve come to appreciate them for much more than the benefits they bring to the soil. 

Advantages of growing goumis

Goumi branches up close and personal.

Advantage #1

They do great in our humid subtropical climate…without getting sprayed with a fungicide. They seem to be completely immune to every kind of fungus out there – unlike the strawberries, peaches, Asian pears, mulberries, apples, grapes we’ve planted. Click here to read about the problems I've had with growing strawberries.

Advantage #2

Their size is manageable for even small backyards. They stay relatively short, six to eight feet tall – no ladders required during harvest – and you space them four to seven feet apart, depending on whether you want a hedge or not. If you plant them four or five feet apart, however, you will probably need to so some pruning once or twice a year.

Advantage #3

This goes hand-in-hand with the first advantage: they are low-maintenance. Unless you have to make them conform to a small space, they don’t need pruning and they can be grown in a wide range of soils.

In my experience, they are somewhat drought tolerant, as I only give each bush about a gallon of water once or twice a week during the dry part of summer and though the leaves do end up looking stressed, the next spring they grow back bigger and more prolific than ever.

BUT…you have to understand two things. First, the bushes have more than six inches of wood chips around them (touching the trunk, the Back To Eden way). Second, because of where we live we begin harvesting in mid-May. Unless the area is suffering through a drought, we get probably half of our annual rainfall March through May, so the bushes get plenty of natural irrigation up until the time of harvest. This will not be true in many northern areas, where goumis are typically not ready to harvest until August.

Which brings us to the next advantage:

Advantage #4

Wherever you live, the goumis are ready to harvest before or between the harvest time of other fruits. This means two things: first, you’re not slaving away having to harvest several types of fruit at once, and second, you’ve got some kind of fresh fruit coming into your house at a time when you normally wouldn’t.

Advantage #5

Goumis are a great source of nutrition. From the website page http://foodforest.co.nz/goumi/:
Goumis are high in vitamin A and E, bioactive compounds, minerals, flavinoids and proteins. Their lycopene content is the highest of any food and is being used in the prevention of heart disease, cancers and in the treatment of cancer. Cooking the fruit increases the lycopene content. The fruits and seeds are an excellent source of essential fatty acids as well which is very unsual for a fruit. The seeds are also edible although somewhat fiberous, and are especially high in proteins and fats.

Advantage #6

Goumis are self-pollinating. So if you only have room for one bush, you can grow just one bush. HOWEVER, they will produce more if you have one variety that helps to pollinate the variety you have.

Advantage #7

Both the flowers and the berries are attractive, and will cover the whole bush (especially if you have more than one variety for cross pollination). The blooms are rather odd-shaped, but put off a wonderful aroma that will attract bees from miles around. And after the berries form, as they turn from green to orange to red they add a brilliant, beautiful splash of color to the landscape.

Of course, goumis aren’t the be-all-end-all perfect fruit.

Disadvantages of growing goumis

**1. Goumis freeze to death in temperatures below minus ten Fahrenheit. So if you live in a USDA growing zone less than zone 6, you’ll have to pass on goumis.

**2. The berries taste sour. Perhaps close to the tartness of a sour cherry, although not as unpalatable as a crab apple. For that reason, while you can eat them raw (unlike elderberries, which are toxic if eaten raw), they are generally used to make jellies, pies and sauces. I primarily use them in smoothies, throwing in a handful or so to add nutrition. But I have to make sure the other fruits in the smoothie are plenty sweet.

**3. The branches have an occasional thorn. Not enough to make harvesting difficult or a literal pain, but enough that if you have small children running around you may want to wait until they’re older before you plant any.

**4. The berries overripen quickly. On the one hand, overripe berries are actually sweet. On the other hand, they may get smushed between your fingers when you try to pick them. Regardless, the short harvesting window means you can lose a lot of berries quickly if you don’t stay on top of picking them.

**5. About a third of the volume of the berry is a soft pit. If you’re eating it fresh, you can swallow it, chew it (it has a gum-like feel in the mouth), or spit it out. If you’re cooking it for jelly or whatnot, you have to strain the pits out. The pits are inconvenient, whichever way you look at it.


Now, if I haven’t totally turned you off on these easy-to-grow bushes…

Where to buy goumis

If you live in growing zones 6-9, there are several places online that sell goumis bushes. We use Raintree Nursery to buy all our fruit trees, bushes, and vines.

How to plant, grow, and harvest goumis

Plant your young goumis the way you’d plant any young fruit tree: in well-drained, amended soil. The depth of the hole should be from the bottom of the roots to the where the “trunk” begins, and the width should be twice that of the root ball.

After planting, if the soil is dry give it about a gallon of water or so.

So far, the wood chips we use for mulch seem to be providing our goumis plenty of nutrition. If you choose not to use the Back To Eden method, the bushes would probably appreciate an application of cottonseed meal in the spring before the flowers open.

Water in the usual way. Generally, that means in the absence of an inch of rain, giving them a deep watering once a week. In order to get established, young plants will need a lot more water their first year (especially if not mulched with a lot of wood chips) than during succeeding years.

As I mentioned earlier, if you use the Back To Eden method, the bushes will not require as much irrigation.

Goumi bushes will produce nothing the first year, but for us they began producing their second year. Sometimes you have to wait until year three. They are ready when they are red-orange to red and give a little when you give them a gentle squeeze. Either the stem comes off the branch with ease, or the berry will slide off the stem with ease. In other words, if you need to pull to take it off, it’s probably not quite ripe.
Two to three cups of goumi berries after about 35 minutes of harvest.

What to do with goumis

  1. Eat them out of hand.
  2. Blend small amounts in smoothies. I have a Vitamix so I just throw the whole berry in, pit and all. Despite the power of this blender, however, you still end up with quite a few pit filaments that you need to either swallow or pick out of your mouth.
  3. Include them in a homemade juice recipe.
  4. Make jelly (recipe here - and no, I am not the Emily at the end of the page. ;) ).
  5. Make a sauce.
*********
There you have it: my take on the glory of goumis! :)